Direct Consolidation Student Loan Repayment Plans
StudentLoanDaddy would like to shine light on the Direct Consolidation Repayment Plans, show what they mean to you, and how they affect your loan repayment. Our goal is that you select the best repayment plan for your present situation. You can, at any time during your repayment, change to an eligible repayment plan better suiting your new situation. (Use the StudentLoanDaddy calculator to better evaluate where you currently stand.)
It is imperative that you are in the correct repayment plan, for your present situation, for the life of your loan! Thousands of borrowers are in inappropriate repayment plans, for their current situation. They soon find themselves either in delinquency, or worse – in default. A simple switch to a more suitable plan would avoid this nasty result.
First, there are two general types of repayment plans:
1) Repayment based upon your loan being repaid within a set period.
This type repayment anticipates that your loan will be fully repaid in a set number of months. There are four repayment plans of this type. They are:
● Standard
● Graduated
● Extended
● Extended Graduated
2) Repayment based upon your current income and family size.
These repayment plans are known as Income Driven Repayment (IDR) plans. Income Driven Repayment plans key upon your income and your family size, NOT your Direct Consolidation loan amount. These plans target your ability to pay, for a given year. An IDR plan does NOT target that your loan is repaid within a specified period. You may, in fact, have a payment of $0.00/month and be considered in good standing. This is the beauty of the IDR plans.
One other interesting attribute of IDR plans: It is conceivable that you could remain in an IDR plan for 20, or 25 years, with a payment of $0.00/month, or some other very low payment, for the entire repayment period! This brings up the question of what happens to my loan? This is where Student Loan Forgiveness kicks in. (Please read our blog on Student Loan Forgiveness for the complete story.)
There are three IDR plans. They are:
● Income Based Repayment (IBR)
● Pay as You Earn (PAYE)
● Income Contingent Repayment (ICR)
StudentLoanDaddy contains the exact formulas for each of these seven plans in its calculator. StudentLoanDaddy also calculates your repayment schedule and eligibility for each of these plans based upon your personal situation and your loans, instantly.
More Details on Each Plan
Let’s take a quick look at each of the seven repayment plans. (There are many other details of these plans and their eligibility requirements not addressed here, but inside the StudentLoanDaddy calculator. Please use the SLD calculator for your exact plan.)
Standard
The Standard Repayment Plan calculates your repayment based upon “standard” amortization used in repaying almost any loan in a certain number of months. The more you owe, the longer the repayment period allowed with this plan. This is the default repayment plan if you do not request a different plan. This is also the plan your loan will revert to if you do not provide the required annual documentation of income if you are on one of the three IDR plans.
Here is the allowed time to repay based upon indebtedness with the Standard Repayment plan.
< $7,500 10 years
$7,500 – < $10,000 12 years
$10,000 – < $20,000 15 years
$20,000 – < $40,000 20 years
$40,000 – < $60,000 25 years
$60,000 and above 30 years
Graduated
The Graduated Repayment plan starts with interest only, for the first two years. After that, your payments increase every two years. This plan allows the same period as the Standard Repayment plan for your repayment.
Extended
This plan is designed for those borrowers with more than $30,000 in Direct Student Loan debt. Under this plan you will have up to 25 years to repay your loan. This plan is calculated the same as the Standard Repayment plan, except the term is 25 years.
Extended Graduated
This plan, as the name suggests, is a hybrid of the Graduated and Extended Repayment plans. You must have more than $30,000 in Direct Student Loans to select this plan. You start off at an interest only payment for the first two years, then your payments increase to repay your loan in 25 years.
Income Based Repayment Plan (IBR) (This is an Income Driven Plan.)
This plan requires demonstration of partial financial hardship (PFH). Your monthly payment is primarily based upon PFH and when you borrowed. In order to remain in this plan, you must submit an annual documentation of income to your servicer. StudentLoanDaddy will prepare this document for you. Use the StudentLoanDaddy calculator to see the exact payment, for your situation.
Pay as You Earn (PAYE) Repayment Plan (This is an Income Driven Plan.)
This plan is based upon your income, but is capped at a Standard Repayment plan payment. This plan is also only available for loans taken in a certain period. Use the full calculator inside StudentLoanDaddy for an exact calculation. You must provide annual documentation of income to your servicer. StudentLoanDaddy will prepare this document for you.
Income Contingent Repayment (ICR) Plan (This is an Income Driven Plan.)
This plan’s calculation is probably the most convoluted of all the plans. However, for your purposes, the plan is based upon where you live and your discretionary income. As your income rises, so will your payments under this plan – up to double the Standard Repayment plan payment. This is the ONLY of the IDR plans not requiring demonstration of financial hardship. However, you still must provide annual documentation of income to your servicer. StudentLoanDaddy will prepare this document for you.
Please read our blog on Student Loan Forgiveness, too.
LendKey
Tuesday, January 20, 2015

Wednesday, January 12, 2011
How to synchronize calendar from Lotus Notes to Google Calendar
I have missed several meetings scheduled in Lotus Notes in the past couple of days. Because I was fully relying on my iPhone to remind me of any upcoming meeting, and Notes Calendar's notification doesn't help that much at all.
So with our friend Google.com, I found the following solution, hopfully can make all we poor Notes users' life a bit sweeter:
1. Sync calendar from Notes to Google
Download this nice open source app from:
http://sourceforge.net/projects/lntogoogle/
No install is required (do need .NET framework, which most of PC already have). Once it is started, simply enter your Google account and Notes login info, then pick a calendar you want to sync the data over (recommend to create a new calendar in Google). Then it can either automatically do the sync or let you control manually. Nice!
2. Sync to iPhone
Somehow iPhone only pick one calendar from my Google account by default. Since I created a new calendar to hold the Notes calendar, I need to let iPhone pick more than Calendar. And here's the solution:
Goto https://www.google.com/
Pick the calendars you want to sync to iPhone and save.
Magically, all the events from my Notes Calendar are in my iPhone now.
3. Reminder
Somehow most of my Notes events don't have a reminder. To let my iPhone remind me, Google allows me to setup a default notification for all event, unless reminder has been explicitly set. So I set my default notification to popup in 10 min, which will let my iPhone popup a little message 10 min before my meetings.
Now my life is back to perfection. Hope the tip helps you too.
Li
So with our friend Google.com, I found the following solution, hopfully can make all we poor Notes users' life a bit sweeter:
1. Sync calendar from Notes to Google
Download this nice open source app from:
http://sourceforge.net/projects/lntogoogle/
No install is required (do need .NET framework, which most of PC already have). Once it is started, simply enter your Google account and Notes login info, then pick a calendar you want to sync the data over (recommend to create a new calendar in Google). Then it can either automatically do the sync or let you control manually. Nice!
2. Sync to iPhone
Somehow iPhone only pick one calendar from my Google account by default. Since I created a new calendar to hold the Notes calendar, I need to let iPhone pick more than Calendar. And here's the solution:
Goto https://www.google.com/
Pick the calendars you want to sync to iPhone and save.
Magically, all the events from my Notes Calendar are in my iPhone now.
3. Reminder
Somehow most of my Notes events don't have a reminder. To let my iPhone remind me, Google allows me to setup a default notification for all event, unless reminder has been explicitly set. So I set my default notification to popup in 10 min, which will let my iPhone popup a little message 10 min before my meetings.
Now my life is back to perfection. Hope the tip helps you too.
Li
Sunday, August 15, 2010
How to monitor Java app started as Windows Service
If you have a Java server running as Windows Service, such as Tomcat, JBoss, etc., it's not possible to run JConsole or JVisualVM to monitor those JVMs, because Windows doesn't allow those apps to see JVM started as Windows Service.
There're two ways I fund over the internet:
1. You can use Sysinternals PsExec.exe to accomplish this.
psexec.exe -i -s c:\visualvm\bin\visualvm.exe2. Use interactive Windows Service:
1. Install a service using sc.exe - that will open a command prompt under local service account by executing this on cmd window

sc create debugservice binpath= "cmd /K start" type= own type= interact

2. sc start debugservice

[on a remote desktop session, this service has to be started only in console session for the command prompt window to pop up]

will print message that [SC] StartService FAILED 1053: but will start a command prompt under local system account.

3. now navigate to %JAVA_HOME%/bin on the command prompt that got opened and type in
jmap -dump:format=b,file=D:\temp\test.hprof
this will dump the heap to D:\temp folder.


Be careful dumping heap on a live system as it will lock up the system for the duration of heap dump.

4. similarly jconsole can be started using that command prompt and connecting to the pid of the tomcat.

Technical explanation:
a. as tomcat service is installed under local system account, jconsole / jmap cannot connect to the service when these are started under the windows logged in user.
b. So the command prompt interactive service is installed as a local system service and when that service is started, it opens the command prompt under local system account.
c. And hence any process started from that command prompt will be started under local system account and hence be able to access any local system services.
Wednesday, April 21, 2010
Run Terracotta Server as Windows Service
Terracotta is a JVM-level Java clustering solution. Lots of Java frameworks and libraries, such as Ehcache, Quartz, Web Session, have been offering clustered version over this nice platform.
This document describes steps to install Terracotta Server as a Windows Service that can be managed and executed just as any other standard Windows services, including auto startup when Windows is started and management through standard service management UI and command.
Preparation
1. Download and install JDK
Goto http://java.sun.com to download JDK 1.6.
As of now, JDK 1.6.0_u17 is certified and recommended.
Install JDK to c:\java\jdk_1.6.0_17
2. Download and install Terracotta
Open source version can be downloaded from http://www.terracotta.org.
Enterprise commercial version can be downloaded by contacting sales@terracottatech.com.
If download is in form of tar.gz file, untar it to c:\terracotta, such as c:\terracotta\terracotta-3.2.1_1.
If download is in jar form, double click the file to start installation. Follow installation steps to install Terracotta to to c:\terracotta, such as c:\terracotta\terracotta-3.2.1_1.
3. If Terracotta License file is needed, copy it to Terracotta Installation Folder, such as \terracotta\terracotta3.2.1_1.
4. Download Windows Resource Kit Tools
Go to http://www.microsoft.com to search and download Windows Resource Kit Tools that is suitable to the targeted Windows version.
Run the installer and install it to the default folder.
Copy anysrv.exe to c:\terracotta\terracotta-3.2.1_1\bin
5. Make sure sc.exe is included in your Windows installation. Otherwise, download it from Microsoft’s website
Configuration
1. Create tc-config.xml to be used by Terracotta Server, place it to bin folder under Terracotta installation home folder.
2. Create Registration file
Create a text file with any text editor, copy paste the following text into the file and save it as tcservice.reg.
Note:
If you need to pass more parameters to TC server, yon can do so by appending them to the AppParameters section. For example, if I want to specify a tc-config.xml and a server name, I can change the AppParameters to:
"AppParameters"="-cp c:\\terracotta\\terracotta-3.2.1_1\\lib\\tc.jar -server -Xms4G –Xmx4G -XX:+HeapDumpOnOutOfMemoryError -Dtc.install-root=c:\\terracotta\\terracotta-3.2.1_1 com.tc.server.TCServerMain -f c:\\terracotta\\my-tc-config.xml -n Server1"
Install Service
1. Create Windows Service
Open a command prompt window as System Administrator.
Run the following command:
It will create a new Windows Service named Terracotta which will be started automatically when Windows is started.
2. Modify service parameter, so it will start Terracotta Server
In the same command prompt box, run:
It will modify the newly created service to run Terracotta Server as a Java application.
Test
1. In Windows Service Management window, start the service. Make sure there’s no error popped up
2. Run dev-console.bat from Terracotta Installation folder and connect to server_name 9520. Developer’s console should be able to login and display the standard Terracotta management interface.
Trouble Shooting
1. Pay attention to quotation signs and garbage characters when copy&paste code snippet from this article
2. To test run the service manually
Since Windows doesn't provide any console based information when starting service, it could be very difficult to trouble shoot problems.
If your service does not start as expected, it is highly recommended to run the service manually just to make sure everything is configured correctly.
To do so, you can follow the following steps:
This document describes steps to install Terracotta Server as a Windows Service that can be managed and executed just as any other standard Windows services, including auto startup when Windows is started and management through standard service management UI and command.
Setup Procedure
1. Download and install JDK
Goto http://java.sun.com to download JDK 1.6.
As of now, JDK 1.6.0_u17 is certified and recommended.
Install JDK to c:\java\jdk_1.6.0_17
2. Download and install Terracotta
Open source version can be downloaded from http://www.terracotta.org.
Enterprise commercial version can be downloaded by contacting sales@terracottatech.com.
If download is in form of tar.gz file, untar it to c:\terracotta, such as c:\terracotta\terracotta-3.2.1_1.
If download is in jar form, double click the file to start installation. Follow installation steps to install Terracotta to to c:\terracotta, such as c:\terracotta\terracotta-3.2.1_1.
3. If Terracotta License file is needed, copy it to Terracotta Installation Folder, such as \terracotta\terracotta3.2.1_1.
4. Download Windows Resource Kit Tools
Go to http://www.microsoft.com to search and download Windows Resource Kit Tools that is suitable to the targeted Windows version.
Run the installer and install it to the default folder.
Copy anysrv.exe to c:\terracotta\terracotta-3.2.1_1\bin
5. Make sure sc.exe is included in your Windows installation. Otherwise, download it from Microsoft’s website
Configuration
1. Create tc-config.xml to be used by Terracotta Server, place it to bin folder under Terracotta installation home folder.
2. Create Registration file
Create a text file with any text editor, copy paste the following text into the file and save it as tcservice.reg.
REGEDIT4

[HKEY_LOCAL_MACHINE\SYSTEM\CurrentControlSet\Services\Terracotta\Parameters]

"Application"="\"C:\\Java\\jdk1.6.0_17\\bin\\java.exe\\"

"AppParameters"="-cp c:\\terracotta\\terracotta-3.2.1_1\\lib\\tc.jar -server -Xms4G –Xmx4G -XX:+HeapDumpOnOutOfMemoryError  -Dtc.install-root=c:\\terracotta\\terracotta-3.2.1_1 com.tc.server.TCServerMain"

"AppDirectory"="c:\\terracotta\\terracotta-3.2.1_1\\"
Note:
If you need to pass more parameters to TC server, yon can do so by appending them to the AppParameters section. For example, if I want to specify a tc-config.xml and a server name, I can change the AppParameters to:
"AppParameters"="-cp c:\\terracotta\\terracotta-3.2.1_1\\lib\\tc.jar -server -Xms4G –Xmx4G -XX:+HeapDumpOnOutOfMemoryError -Dtc.install-root=c:\\terracotta\\terracotta-3.2.1_1 com.tc.server.TCServerMain -f c:\\terracotta\\my-tc-config.xml -n Server1"
Install Service
1. Create Windows Service
Open a command prompt window as System Administrator.
Run the following command:
sc.exe create Terracotta binPath= “c:\terracotta\terracotta-3.2.1_1\bin\srvany.exe” type= own start= auto DisplayName= “Terracotta Server 3.2.1_1”It will create a new Windows Service named Terracotta which will be started automatically when Windows is started.
2. Modify service parameter, so it will start Terracotta Server
In the same command prompt box, run:
regedit tcserver.regIt will modify the newly created service to run Terracotta Server as a Java application.
Test
1. In Windows Service Management window, start the service. Make sure there’s no error popped up
2. Run dev-console.bat from Terracotta Installation folder and connect to server_name 9520. Developer’s console should be able to login and display the standard Terracotta management interface.
Trouble Shooting
1. Pay attention to quotation signs and garbage characters when copy&paste code snippet from this article
2. To test run the service manually
Since Windows doesn't provide any console based information when starting service, it could be very difficult to trouble shoot problems.
If your service does not start as expected, it is highly recommended to run the service manually just to make sure everything is configured correctly.
To do so, you can follow the following steps:
- Open a Commend Shell
- Go to folder defined by AppDirectory
- Run the Application with AppParameters
CD c:\terracotta\terracotta-3.2.1_1C:\Java\jdk1.6.0_17\bin\java.exe -cp c:\terracotta\terracotta-3.2.1_1\lib\tc.jar -server -Xms4G –Xmx4G -XX:+HeapDumpOnOutOfMemoryError -Dtc.install-root=c:\terracotta\terracotta-3.2.1_1 com.tc.server.TCServerMain
Friday, March 26, 2010
Install ColdFusion 8 on Snow Leopard
I need to test something in ColdFusion 8 on my MacBook Pro with Snow Leopard. After I downloaded and unzipped the installer, the installer simply did not run. I double click on the ColdFusion 8 Installer.app from Finder, nothing happened. I guess the Install Anywhere script which was used to create installer for CF 8 might have issue with Snow Leopard.
From internet, there're lots of articles about how run CF8 in Snow Leopard, no one really talked about installation part. Hope I'm not the only one that had this problem.
Anyway, I do managed to find a way to do the installation. Here's what I did:
1. Open a Terminal
2. cd ColdFusion\ 8\ Installer.app
3. cd Contents/Resources/Java
4. java -cp ./IAClasses.zip:Execute.zip:installscript.zip:. com.zerog.ia.installer.Main
5. Follow the steps and I was able to finish setup and run CF8
Cheers!
Li
From internet, there're lots of articles about how run CF8 in Snow Leopard, no one really talked about installation part. Hope I'm not the only one that had this problem.
Anyway, I do managed to find a way to do the installation. Here's what I did:
1. Open a Terminal
2. cd ColdFusion\ 8\ Installer.app
3. cd Contents/Resources/Java
4. java -cp ./IAClasses.zip:Execute.zip:installscript.zip:. com.zerog.ia.installer.Main
5. Follow the steps and I was able to finish setup and run CF8
Cheers!
Li
Monday, November 16, 2009
PHP cannot connect to mysql when run inside Apache
I ran into a very strange issue when Apache/PHP/MySQL.
What happend was my php code suddenly cannot connect to mysql on another machine any more. The error message is:
After searched around, I finally found the answer. Looks like it has something to do with SELinux settings.
To fix the issue, I only need to run:
Before I ran the script, the file content of /selinux/booleans/httpd_can_network_connect_db was:
0 0
After I ran the script, content changed to:
1 1
What happend was my php code suddenly cannot connect to mysql on another machine any more. The error message is:
mysqli_connect() [function.mysqli-connect]: (HY000/2003): Can't connect to MySQL server on '218.241.156.222' (13)The strange thing was that if I connect mySQL from command line, even run the same code by php directly from command line, it worked just fine.
After searched around, I finally found the answer. Looks like it has something to do with SELinux settings.
To fix the issue, I only need to run:
setsebool httpd_can_network_connect_db 1
Before I ran the script, the file content of /selinux/booleans/httpd_can_network_connect_db was:
0 0
After I ran the script, content changed to:
1 1
Saturday, November 7, 2009
Trick to let iTune handle Chinese song names and tags correctly in Mac OS X
When play Chinese songs in iTune, it always tends to show the song information, such as name, artist, album, etc. as garbage text.
When I was running Mac OSX Tiger and Leopard, the trick I used was to open iTune application information by right-click and choose Get Info.
In the information windows, remove all languages except Chinese. So next time, when iTune is started, it starts in Chinese mode. And it handles all Chinese songs correctly.
In Snow Leopard, the language selection is missing in Get Info dialog. It took me a few weeks to find the new trick.
Then start iTune, you will get it in Chinese mode again and just as the trick before, all Chinese songs are handled correctly.
Hope these tricks can be helpful to Chinese Mac users.
Enjoy!
BTW: If you speak other language and suffers the sames kind of problem, I guess you can try to delete all other languages other than your preference. Hopefully that will work for you too.
When I was running Mac OSX Tiger and Leopard, the trick I used was to open iTune application information by right-click and choose Get Info.
In the information windows, remove all languages except Chinese. So next time, when iTune is started, it starts in Chinese mode. And it handles all Chinese songs correctly.
In Snow Leopard, the language selection is missing in Get Info dialog. It took me a few weeks to find the new trick.
cd /Applications/iTunes.app/Contents/Resources
mkdir lang_bak
mv *.lproj lang_bak
cp -r lang_bak/zh_CN.lproj .
Then start iTune, you will get it in Chinese mode again and just as the trick before, all Chinese songs are handled correctly.
Hope these tricks can be helpful to Chinese Mac users.
Enjoy!
BTW: If you speak other language and suffers the sames kind of problem, I guess you can try to delete all other languages other than your preference. Hopefully that will work for you too.
Sunday, May 17, 2009
Monitor detailed SQL transactions issued by Hibernate
Hibernate help us translate access to Java objects from HQL to native SQL and automatically take care of object relationships, which saves developers lots of time, but at the same time, hide lots of details, such as how cross table queries are created, how tables are related and, very important, what data parameters are used for each prepared statetment is called.
To show SQL commands generaeted by Hibernate, we can normally use Hibernate config:
With this setting, Hibernate dumps all SQL it executed against DB as below:
However, if you want to see what exact value is passed into the SQL statement, and further more, what result was returned from the SQL command, we need to do more.
Basically we need to set log4j settings of the follow two Hibernate classes into DEBUG:
So the log4j.properties file will have the following settings:
Then Hibernate will dump debug information as below:
If you are a newbie in Hibernate, you will be amazed to see what is going on underneath by Hibernate, either in a positive and encouraging way or a very bad negative way.
Cheers!
To show SQL commands generaeted by Hibernate, we can normally use Hibernate config:
true With this setting, Hibernate dumps all SQL it executed against DB as below:
Hibernate: select device0_.iid as iid1_0_, device0_.iname as iname1_0_, device0_.iip as iip1_0_, device0_.iinfourl as iinfourl1_0_, device0_.istate as istate1_0_, device0_.irecordState as irecordS6_1_0_, device0_.idevlocation as idevloca7_1_0_ from ieai_device device0_ where device0_.iid=?
However, if you want to see what exact value is passed into the SQL statement, and further more, what result was returned from the SQL command, we need to do more.
Basically we need to set log4j settings of the follow two Hibernate classes into DEBUG:
org.hibernate.SQL
org.hibernate.Type
So the log4j.properties file will have the following settings:
log4j.logger.org.hibernate.SQL=DEBUG,console
log4j.logger.org.hibernate.type=DEBUG,console
Then Hibernate will dump debug information as below:
76033 [DEBUG] AbstractBatcher.log(): - select device0_.iid as iid1_0_, device0_.iname as iname1_0_, device0_.iip as iip1_0_, device0_.iinfourl as iinfourl1_0_, device0_.istate as istate1_0_, device0_.irecordState as irecordS6_1_0_, device0_.idevlocation as idevloca7_1_0_ from ieai_device device0_ where device0_.iid=?
Hibernate: select device0_.iid as iid1_0_, device0_.iname as iname1_0_, device0_.iip as iip1_0_, device0_.iinfourl as iinfourl1_0_, device0_.istate as istate1_0_, device0_.irecordState as irecordS6_1_0_, device0_.idevlocation as idevloca7_1_0_ from ieai_device device0_ where device0_.iid=?
76033 [DEBUG] NullableType.nullSafeSet(): - binding '3' to parameter: 1
76043 [DEBUG] NullableType.nullSafeGet(): - returning 'Device3' as column: iname1_0_
76044 [DEBUG] NullableType.nullSafeGet(): - returning '192.168.0.12' as column: iip1_0_
76044 [DEBUG] NullableType.nullSafeGet(): - returning 'http://www.infolexllc.com/site/' as column: iinfourl1_0_
76047 [DEBUG] NullableType.nullSafeGet(): - returning '1' as column: istate1_0_
76047 [DEBUG] NullableType.nullSafeGet(): - returning '2' as column: irecordS6_1_0_
76048 [DEBUG] NullableType.nullSafeGet(): - returning 'test device location' as column: idevloca7_1_0_
If you are a newbie in Hibernate, you will be amazed to see what is going on underneath by Hibernate, either in a positive and encouraging way or a very bad negative way.
Cheers!
Wednesday, May 13, 2009
Customize Eclipse JVM in Mac
On Windows, we can change eclipse.ini under eclipse folder to put extra parameters for JVM.
On Mac, the ini file is located at:
eclipse/Eclipse.app/Contents/MacOS/eclipse.ini
On Mac, the ini file is located at:
eclipse/Eclipse.app/Contents/MacOS/eclipse.ini
Monday, May 4, 2009
How to bing dyanmic IP to a subdomain
We have a server with dedicated IP address in my company's headquarter. There're a couple of branches at other locations. We need to setup servers in each branch and allow accessing to those servers through dedicated subdomain name. But we do not have static IP for those branches, so it's not possible to bind any IP in our DNS server at headquarter.
If you have the same need as we are, here's what we did to resolve the problem.
Basically we need to setup DNS Update service at branch site to perform remote DNS update to headquarter to update IP of subdomains used by branch site periodically, so headquarter's DNS will always know the correct IP of each branch server.
For example, our main domain is infolexllc.com, and we need to setup a branch server at New York which will be called ny.infolexllc.com, here's what we do at servers at both ends (both CentOS 5.X):
At branch site(where only dynamic IP is available):
1. Install NS Update:
2. Create folder to hold related files and scripts:
3. create key files for NS update
4. You should have two new files created under the current folder:
5. create a new shell file: donsupdate.sh:
Make sure you change value of the script based-on your own environment.
6. Open the newly generated key file Kny.infolexllc.com.+157+47223.key
Remember the key string started from QlwMC.. all the way to the ending ==
On headquarter server:
7. Modify named comnfiguration to allow remote DNS update from ny.infolexllc.com
Open /etc/named.conf
Find zone "infolexllc.com" {
Insert the following section in the configuration file before the zone:
key ny.infolexllc.com.{
algorithm hmac-md5;
secret "QLwMCWdqUJ/ZOsOsdF4Dj/mYD2XwmqSrPL540JE3dwG7FXZwrJulOp16 Y0SySnfOo7+5s1mhZhUiAHxVOSoXnQ==";
};
Insert the following lines at end of the infolexllc.com zone:
allow-update {
key ny.infolexllc.com. ;
};
Restart DNS server:
Now the headquarter DNS server should allow remote DNS update from ny.infolexllc.com
On branch server:
8. Test DNS update script:
run
You should see messages like below:
The status: NOERROR indicates a succeful update.
If you see any other error in status, go check /var/log/messages on head quarter server to find clue.
9. Test the new domain:
You should see the new domain can be resolved to the dynamic IP currently assigned to branch server.
10. Once update script is working, you can create a cron job on branch server to run the script every 10 minutes. The script itself will check if IP has not been changed in the past hour, it will skip remote update.
I've done this for our branch servers several times. It works very well so far. I hope this set up can help resolving your problem. Feel free to let me know f you have any feedback or question.
Cheers!
If you have the same need as we are, here's what we did to resolve the problem.
Basically we need to setup DNS Update service at branch site to perform remote DNS update to headquarter to update IP of subdomains used by branch site periodically, so headquarter's DNS will always know the correct IP of each branch server.
For example, our main domain is infolexllc.com, and we need to setup a branch server at New York which will be called ny.infolexllc.com, here's what we do at servers at both ends (both CentOS 5.X):
At branch site(where only dynamic IP is available):
1. Install NS Update:
yum install bind-utils
2. Create folder to hold related files and scripts:
mkdir /root/nsupdate
cd /root/nsupdate
3. create key files for NS update
dnssec-keygen -a HMAC-MD5 -b 512 -n USER ny.infolexllc.com
Kny.infolexllc.com.+157+47223
4. You should have two new files created under the current folder:
Kny.infolexllc.com.+157+47223.key Kny.infolexllc.com.+157+47223.private
5. create a new shell file: donsupdate.sh:
Make sure you change value of the script based-on your own environment.
6. Open the newly generated key file Kny.infolexllc.com.+157+47223.key
ny.infolexllc.com. IN KEY 0 3 157 QLwMCWdqUJ/ZOsOsdF4Dj/mYD2XwmqSrPL540JE3dwG7FXZwrJulOp16 Y0SySnfOo7+5s1mhZhUiAHxVOSoXnQ==
Remember the key string started from QlwMC.. all the way to the ending ==
On headquarter server:
7. Modify named comnfiguration to allow remote DNS update from ny.infolexllc.com
Open /etc/named.conf
Find zone "infolexllc.com" {
Insert the following section in the configuration file before the zone:
key ny.infolexllc.com.{
algorithm hmac-md5;
secret "QLwMCWdqUJ/ZOsOsdF4Dj/mYD2XwmqSrPL540JE3dwG7FXZwrJulOp16 Y0SySnfOo7+5s1mhZhUiAHxVOSoXnQ==";
};
Insert the following lines at end of the infolexllc.com zone:
allow-update {
key ny.infolexllc.com. ;
};
Restart DNS server:
/etc/init.d/named restart
Now the headquarter DNS server should allow remote DNS update from ny.infolexllc.com
On branch server:
8. Test DNS update script:
run
donsupdate.sh
You should see messages like below:
Detected IP address is:123.123.123.123
IP has been changed or one hour has been passed, save the flag and do update...
Creating key...
before getaddrinfo()
Outgoing update query:
;; ->>HEADER<<- opcode: UPDATE, status: NOERROR, id:      0
;; flags: ; ZONE: 0, PREREQ: 0, UPDATE: 0, ADDITIONAL: 0
;; UPDATE SECTION:
ny.infolexllc.com. 0 ANY A
ny.infolexllc.com. 84600 IN A 123.123.123.123


Reply from update query:
;; ->>HEADER<<- opcode: UPDATE, status: NOERROR, id:  25321
;; flags: qr ; ZONE: 0, PREREQ: 0, UPDATE: 0, ADDITIONAL: 1
;; TSIG PSEUDOSECTION:
ny.infolexllc.com. 0 ANY TSIG hmac-md5.sig-alg.reg.int. 123123123123 300 16 ABCabcABCabc123+12aBcde== 25321 NOERROR 0
The status: NOERROR indicates a succeful update.
If you see any other error in status, go check /var/log/messages on head quarter server to find clue.
9. Test the new domain:
ping ny.infolexllc.com
You should see the new domain can be resolved to the dynamic IP currently assigned to branch server.
10. Once update script is working, you can create a cron job on branch server to run the script every 10 minutes. The script itself will check if IP has not been changed in the past hour, it will skip remote update.
I've done this for our branch servers several times. It works very well so far. I hope this set up can help resolving your problem. Feel free to let me know f you have any feedback or question.
Cheers!
Thursday, April 23, 2009
How to match lines that does not start with certain string(s)
I had a task to parse a huge log file and needed to pick up only those lines started with certain strings like:
CPU_ALL
ZZZZ
etc.
So I fired up Eclipse, opened the file, and opened Find/Replace dialog box. In the dialog, I tried to replace:
with
So Eclipse find all strings that does not start with CPU_ALL nor ZZZZ and replaced those lines with space.
I was able to do another Replace of ^\n$ with Blank, so all blank lines got removed. But some how Eclipse complaint I had incompatible end of lines. So I opened the text file with my favorite text editor Notepad++ and ran its "Remove blank lines" plugin to get the job done.
The key here is
which matches string that does not start with "CPU_ALL".
And another
Cheers!
CPU_ALL
ZZZZ
etc.
So I fired up Eclipse, opened the file, and opened Find/Replace dialog box. In the dialog, I tried to replace:
^\b(?!CPU_ALL)(?!ZZZZ)\w+\b.*$
with
Blank
So Eclipse find all strings that does not start with CPU_ALL nor ZZZZ and replaced those lines with space.
I was able to do another Replace of ^\n$ with Blank, so all blank lines got removed. But some how Eclipse complaint I had incompatible end of lines. So I opened the text file with my favorite text editor Notepad++ and ran its "Remove blank lines" plugin to get the job done.
The key here is
(?!CPU_ALL)
which matches string that does not start with "CPU_ALL".
And another
(?!ZZZZ)right after allows me to exclude another string.
Cheers!
Monday, March 23, 2009
How to write a servlet filter
Since you can call HttpServletResponse.getWriter() only once, it is a little bit tricky to add more output in servlet filter, because it is very likely your call to getWriter to be failed.
Come examples about filter can be found at:
http://download.oracle.com/docs/cd/A97329_03/web.902/a95878/filters.htm
Come examples about filter can be found at:
http://download.oracle.com/docs/cd/A97329_03/web.902/a95878/filters.htm
Monday, March 16, 2009
Tips on svnmailer
svnmailer is a great tool to help admin monitor changes made in SVN repositories.
There're zillions of nice articles/docs on how to config it. So I won't bother adding one more here.
Only a couple of tips that I hope can help myself and you trouble-shooting it:
1. To remove =3D kind of characters in email
Looks like the current version of svnmailer (1.08x) and Python 2.4.3 will generate characters like =3D to replace special character = in the notification email. This is caused by the default encoding used by svnmailer (quoted-printable). The quick fix is to set it to utf8.
To apply the quick fix, open mailer.conf file, put the following setting in [defaults] section:
2. To test svnmailer without really committing anything into the repository:
After your configured svnmailer, you probably want to test the settings, but do not want to really commit anything into the repository. A quick command, which was actually suggested by svnmailer doc, is:
e.g.:
will send notification of change 55 of repository /var/svn/2009 to the designated email address.
Cheers!
There're zillions of nice articles/docs on how to config it. So I won't bother adding one more here.
Only a couple of tips that I hope can help myself and you trouble-shooting it:
1. To remove =3D kind of characters in email
Looks like the current version of svnmailer (1.08x) and Python 2.4.3 will generate characters like =3D to replace special character = in the notification email. This is caused by the default encoding used by svnmailer (quoted-printable). The quick fix is to set it to utf8.
To apply the quick fix, open mailer.conf file, put the following setting in [defaults] section:
mail_transfer_encoding = 8bit
2. To test svnmailer without really committing anything into the repository:
After your configured svnmailer, you probably want to test the settings, but do not want to really commit anything into the repository. A quick command, which was actually suggested by svnmailer doc, is:
sudo -u apache ./post-commit [Repo Path] [Ver No.]
e.g.:
sudo -u apache ./post-commit /var/svn/2009 55
will send notification of change 55 of repository /var/svn/2009 to the designated email address.
Cheers!
Monday, February 23, 2009
Nagios killed all web sites created by virtualmin
I have a bunch of domains running on a Linux box. They are managed by VirtualMin. Each site has its own user name, group and home folder.
For example, site www.infolexllc.com under VirtualMin has user name and groups infolex as well as home folder /home/infolex.
The document root of the site is /home/infolex/public_html.
Everything was working great until I installed Nagios, hoping it could help me monitor status of my server.
But after Nagios was installed, all my sites on this server became unaccessible. when I pointed my browser to:
http://www.infolexllc.com
I got 403 error saying there's no permission to access the site.
I remember I ran into similar issue on a client's server before. So I found log I wrote down about two years ago. Looks like Nagios somehow removed user apache from group apache. Therefore, Apache server lost access right to website's document root which was owned by apache.apache.
So I guess similar thing must happened to my server also. I checked owner of /home/infolex/public_html, it's infolex.infolex.
I check groups apache belongs to, they are:
So I added apache back top group infolex by:
I did the same to all other virtual hosts on the same server.
Then restart Apache. Everything is back to work!
I'm still having problem with Nagois itself so far. Will post more if I ran into anything worth to share.
For example, site www.infolexllc.com under VirtualMin has user name and groups infolex as well as home folder /home/infolex.
The document root of the site is /home/infolex/public_html.
Everything was working great until I installed Nagios, hoping it could help me monitor status of my server.
But after Nagios was installed, all my sites on this server became unaccessible. when I pointed my browser to:
http://www.infolexllc.com
I got 403 error saying there's no permission to access the site.
I remember I ran into similar issue on a client's server before. So I found log I wrote down about two years ago. Looks like Nagios somehow removed user apache from group apache. Therefore, Apache server lost access right to website's document root which was owned by apache.apache.
So I guess similar thing must happened to my server also. I checked owner of /home/infolex/public_html, it's infolex.infolex.
I check groups apache belongs to, they are:
apache, nagois, nagiocmd
So I added apache back top group infolex by:
/usr/sbin/usermod -a -G infolex apache
I did the same to all other virtual hosts on the same server.
Then restart Apache. Everything is back to work!
I'm still having problem with Nagois itself so far. Will post more if I ran into anything worth to share.
Monday, February 16, 2009
Google Gear slows down WIFI?!
Man! if you read my previous post, you already know I have been fighting WIFI slowness on my Mac for many days.
I installed a 16Mbps Comcast business broadband service about two weeks ago. Since then, I noticed my MacBook Pro's WIFI speed drops down to only 100Kbps almost all the time. It's only good for a very short period of time after I restart router, blindly changed some setting on my MacBook Pro or router.
There were many times I thought the problem got resolved, I even posted a BLOG to celebrate it :). But after a few more minutes, the problem always comes back! My hair got almost pulled out completely and my mind became crazy!
Finally from last night, I noticed ping time in my network was very unreliable:
I started thinking maybe I should try close all application one at a time and see if any of them had any impact on the thing.
So I left a terminal open, with ping running, so I could see change of ping speed. At the same time, I started to close applications I run, such as Adium, Skype, Firefox... Wait! after Firefox was close, the ping speed turned back to a normal range:
It got be Firefox!
Then another question comes back. Why did Firefox behave pretty good before? And I cannot live without it.
That's when I realized I installed GoogleGear to enable offline access to my gmail account almost the same time when I installed Comcast. Could that plugin be a problem? Easy to know. I removed this plugin. And everything is back to normal, even with Firefox running! I enabled/disabled it many times just to confirm. And looks like IT WAS GOOGLEGEAR THAT CAUSED ALL MY HAIR-LOSS!
I will report the problem to our google friend. In the mean time, in case you are losing your hair as I was. Hope this post helps.
Li
I installed a 16Mbps Comcast business broadband service about two weeks ago. Since then, I noticed my MacBook Pro's WIFI speed drops down to only 100Kbps almost all the time. It's only good for a very short period of time after I restart router, blindly changed some setting on my MacBook Pro or router.
There were many times I thought the problem got resolved, I even posted a BLOG to celebrate it :). But after a few more minutes, the problem always comes back! My hair got almost pulled out completely and my mind became crazy!
Finally from last night, I noticed ping time in my network was very unreliable:
64 bytes from 192.168.0.5: icmp_seq=1757 ttl=64 time=0.933 ms
64 bytes from 192.168.0.5: icmp_seq=1758 ttl=64 time=1095.138 ms
64 bytes from 192.168.0.5: icmp_seq=1759 ttl=64 time=102.211 ms
64 bytes from 192.168.0.5: icmp_seq=1760 ttl=64 time=1451.482 ms
64 bytes from 192.168.0.5: icmp_seq=1761 ttl=64 time=467.000 ms
64 bytes from 192.168.0.5: icmp_seq=1762 ttl=64 time=1859.467 ms
64 bytes from 192.168.0.5: icmp_seq=1763 ttl=64 time=861.624 ms
64 bytes from 192.168.0.5: icmp_seq=1764 ttl=64 time=1.828 ms
I started thinking maybe I should try close all application one at a time and see if any of them had any impact on the thing.
So I left a terminal open, with ping running, so I could see change of ping speed. At the same time, I started to close applications I run, such as Adium, Skype, Firefox... Wait! after Firefox was close, the ping speed turned back to a normal range:
64 bytes from 192.168.0.5: icmp_seq=453 ttl=64 time=2.267 ms
64 bytes from 192.168.0.5: icmp_seq=454 ttl=64 time=1.001 ms
64 bytes from 192.168.0.5: icmp_seq=455 ttl=64 time=1.004 ms
64 bytes from 192.168.0.5: icmp_seq=456 ttl=64 time=0.987 ms
64 bytes from 192.168.0.5: icmp_seq=457 ttl=64 time=1.197 ms
64 bytes from 192.168.0.5: icmp_seq=458 ttl=64 time=1.008 ms
64 bytes from 192.168.0.5: icmp_seq=459 ttl=64 time=1.245 ms
It got be Firefox!
Then another question comes back. Why did Firefox behave pretty good before? And I cannot live without it.
That's when I realized I installed GoogleGear to enable offline access to my gmail account almost the same time when I installed Comcast. Could that plugin be a problem? Easy to know. I removed this plugin. And everything is back to normal, even with Firefox running! I enabled/disabled it many times just to confirm. And looks like IT WAS GOOGLEGEAR THAT CAUSED ALL MY HAIR-LOSS!
I will report the problem to our google friend. In the mean time, in case you are losing your hair as I was. Hope this post helps.
Li
Tuesday, February 10, 2009
WIFI slowness of my Macbook Pro
My Macbook Pro (2007 edition)'s WIFI turned to be very slow recently. Speed test (http://www.speedtest.net) sometime report only 10K download while I have 15M Comcast broadband.
I struggled many days and tried different ways I could imagine, even bough a new router, problem still unresolved.
Today, I tried to check /var/log/system.log and found lots of error messages like:
Then I Googled the keywords:mDNSResponder[22]: RegisterSplitDNS: bad domain . and found a hint at:
http://discussions.apple.com/message.jspa?messageID=6911574
Followed suggestion from the site, I finally managed to resolve my issue. Since the DNS error msg is gone, my MacBook Pro could do 14Mbps on wifi.
Here's summary of what I did:
1. run scutil --dns and saw something like:
2. Open Keychain Access
3. Click on System at left side
4. Find and delete item named DNS Key
5. Reboot
6. Problem resolved!
I struggled many days and tried different ways I could imagine, even bough a new router, problem still unresolved.
Today, I tried to check /var/log/system.log and found lots of error messages like:
Feb  9 01:10:06 li-mac-2 mDNSResponder[22]: AppendDNSNameString: Illegal empty label in name "."
Feb  9 01:10:06 li-mac-2 mDNSResponder[22]: RegisterSplitDNS: bad domain .
Then I Googled the keywords:mDNSResponder[22]: RegisterSplitDNS: bad domain . and found a hint at:
http://discussions.apple.com/message.jspa?messageID=6911574
Followed suggestion from the site, I finally managed to resolve my issue. Since the DNS error msg is gone, my MacBook Pro could do 14Mbps on wifi.
Here's summary of what I did:
1. run scutil --dns and saw something like:
DNS configuration

resolver #1
  nameserver[0] : 192.168.0.1
  order   : 200000

resolver #2
domain : .
options : pdns
timeout : 5
order : 150000

resolver #3
  domain : local
  options : mdns
  timeout : 2
  order   : 300000
...
2. Open Keychain Access
3. Click on System at left side
4. Find and delete item named DNS Key
5. Reboot
6. Problem resolved!
Friday, January 23, 2009
Thread-safe singlton instantiation
Very often that we need to get instance of a single which is initialized Lazily, meaning only when it is first be needed.
What we normally do is:
After reading a scary article about Java memory model, I realized this code does not always work in a multi-threaded environment:
http://www.ibm.com/developerworks/library/j-jtp03304/
and
http://www.ibm.com/developerworks/java/library/j-jtp02244.html
and
http://www.javaworld.com/jw-02-2001/jw-0209-double.html
The idea is complicated, but to describe it in a simple sentence, I would say:
Because modern compiler might reorder execution sequence of the commands, the code might fail under certain hardware/software environment.
So a safer solution is:
Because JVM guarantee initialization and execution order static inner classes, this solution is not only safe, but also faster than using
What we normally do is:
After reading a scary article about Java memory model, I realized this code does not always work in a multi-threaded environment:
http://www.ibm.com/developerworks/library/j-jtp03304/
and
http://www.ibm.com/developerworks/java/library/j-jtp02244.html
and
http://www.javaworld.com/jw-02-2001/jw-0209-double.html
The idea is complicated, but to describe it in a simple sentence, I would say:
Because modern compiler might reorder execution sequence of the commands, the code might fail under certain hardware/software environment.
So a safer solution is:
Because JVM guarantee initialization and execution order static inner classes, this solution is not only safe, but also faster than using
volatile or synchronized keywords.
Thursday, January 22, 2009
Javascript compressors
I ran into a nice websites that compares JS compressors on the fly. Cool stuff. So I write down here as a reference for myself, and you, just in case:
http://compressorrater.thruhere.net/
http://compressorrater.thruhere.net/
Wednesday, January 14, 2009
Style check for Javascript files
Like PMD/StyleCheck for Java, I finally found a tool to perform coding style check and also to find common mistakes from JavaScript files:
http://www.javascriptlint.com
Check their sample and doc for details. It's not so comprehensive/powerful as PMD/StyleCheck, but should be a good start for JS.
Sunday, January 11, 2009
Change default Java version on Mac
The default Java on Mac (as of today) is 1.5.
I went to Apple's site and downloaded 1.5 update which includes 1.6 64bit. But the download page specifically said it does not change Mac's default setting.
In order to use the new Java 1.6 as the default JVM, need to do the following after the update is downloaded and installed:
1. Run /Aplication/Utilities/Java/Java Preferences
This is screen on my MacBookPro:
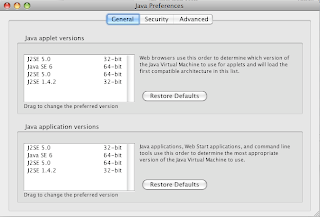
2. Click and drag Jave SE 6 64-bit to top of both list, and exit the program.
Now open a terminal, run
The result should be:
I went to Apple's site and downloaded 1.5 update which includes 1.6 64bit. But the download page specifically said it does not change Mac's default setting.
In order to use the new Java 1.6 as the default JVM, need to do the following after the update is downloaded and installed:
1. Run /Aplication/Utilities/Java/Java Preferences
This is screen on my MacBookPro:

2. Click and drag Jave SE 6 64-bit to top of both list, and exit the program.
Now open a terminal, run
java -version
The result should be:
java version "1.6.0_07"
Java(TM) SE Runtime Environment (build 1.6.0_07-b06-153)
Java HotSpot(TM) 64-Bit Server VM (build 1.6.0_07-b06-57, mixed mode)
Subscribe to:
Posts (Atom)